

By Vic Syracuse, EAA Lifetime 180848
This story originally ran in the February 2020 issue of EAA Sport Aviation.
This month I want to address intake gaskets and hoses on Lycoming engines, as they seem to be one of the most overlooked maintenance items. I see aircraft 10-plus years old with close to 1,000 hours on them that have never had them replaced. These particular gaskets and hoses are on the hot side of our downdraft cooled engines. In the case of the hoses, they are usually quite close to the exhaust stacks in many installations and, consequently, tend to dry out and crack. Unlike a fouled spark plug or a bad magneto that tends to give us a failure mode that is recognizable, the failure modes of the intake system tend to insidiously sneak up on us, and usually have us chasing down other components as the culprits. They fail so slowly over the course of time and require replacement so infrequently that they don’t usually come to the top of mind. I personally believe they should be on the preventive maintenance list to be changed every 300-500 hours depending upon aircraft usage.
So, what are the symptoms? I can tell immediately when an airplane is taxiing up to our hangar if the gaskets need replacing, as the idle is usually “hunting” and this is more noticeable when the engine is hot. Many times, an aircraft will be brought to us because it is hard starting (especially with carbureted engines), and the owner has already changed out the spark plugs and checked the ignition timing. A tight intake system is especially needed for the cylinders to draw the fuel from the carb to the cylinders for starting. In the case of our aircraft, unlike most cars, the carb is on the bottom of the engine and the fuel has to be sucked up. If there’s a leak between the carb and the cylinder, the suction power gets diminished. No fuel, no start.

As a matter of fact, I noticed the same idle symptoms on my own RV-10, which has a Lycoming Thunderbolt engine (IO-540) on it, which I installed new two and a half years and 480 hours ago. Sure enough, I replaced the gaskets and hoses and all is fixed now. Surprisingly, the intake gaskets were, in fact, brittle and leaking.
Injected engines aren’t quite as susceptible, as the raw fuel is injected into the engine (just like a primer on a carb’s engine), but the fuel servo is still measuring the airflow so as to apply the right amount of fuel, and the leaking gaskets will have an adverse effect.
Here’s a quick check for you to try every time you fly if you have a multicylinder EGT gauge: Watch your EGT indication when you pull the power back to a complete idle while on base leg or final (do please pay attention to flying the aircraft first!). If the EGTs on any cylinder increase, you have a leak. It works every time.
Another way to check for leaks or deformation is through a visual inspection. The most obvious sign of a leaking gasket will be blue fuel stains around the intake tube from the 100LL dye. In some cases, the fuel can be seen running down the tube all the way to the intake hose. Sometimes just poking at the edge of the gasket with a screwdriver will help you see if they are brittle. As for the hoses, a quick visual inspection will usually identify cracks around the edges, as well as deformation from constantly being overtightened.

Changing the gaskets and hoses is really not all that difficult and should only take about 30 minutes per cylinder. No special tools are needed, and the parts are less than $10 per cylinder. The intake flange tube is held on with two 1/4-inch bolts, which are easily accessible. A 1/4-inch socket with a universal drive makes easy work of them. The hoses are usually held onto the lower tubes with hose clamps. Don’t forget to replace the star washers on the bolts with new ones, as they are use-once items. Yes, I have found intake bolts missing, and I can only assume they weren’t properly torqued or the star washer was reused.
It is important that you clean off all of the old gasket material before inserting the new gasket. Yes, I have seen some on which I can see the last two colors of gaskets used! You can remove the largest pieces of the old gasket with a razor blade; just be careful to not scratch the cylinder flange. I find a Dremel with a rotary brush on it does a really nice job of cleaning up the cylinder flange and the top of the intake tube without doing any damage to the mating surfaces. There is no sense in taking the time to replace the gaskets if you aren’t going to take the time to ensure a good seal.
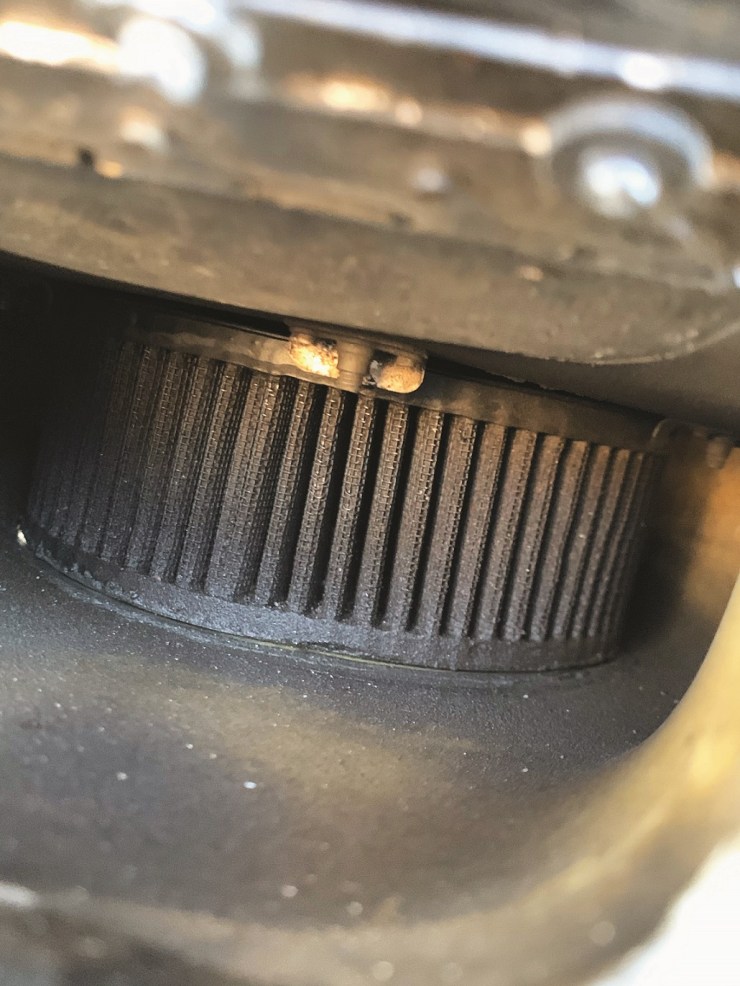
Speaking of the intake system, while you’re at it, please check the air filter. I’ve been really shocked at some of the air filters I see. Most experimental amateur-built aircraft now use the K&N series of air filters. Yes, I know they say “lifetime” air filter on them, but that is when they are installed in your car. The filter in your car is usually installed in the intake inlet on top of the engine, where it is substantially cooler than on the bottom of our hot engines. In addition to the heat impact, the location in our aircraft also allows fuel to run down on the filter, causing shrinkage and hardening, as well as damage from backfires. A shrunken and hardened filter will have gaps where it is allowing unfiltered air to go right into that really expensive engine on your airplane. For $50 or less, I recommend replacing them every three to five years as well.
As I write this column, I am still savoring the food from yesterday’s Thanksgiving meal. By the time you read this, we will be well into the winter season, at least in the Northern Hemisphere. Since flying days may be limited, consider doing some of these preventive maintenance activities so that the fun factor will be enjoyed during the upcoming flying season. And check those jam nuts! In the last month, I have found nine more loose jam nuts on nine different aircraft during an airworthiness inspection, including one RV-10 that had been flying for 10 years and one RV-7A. The RV-7A was meticulously built, with torque seal on every single jam nut throughout the airplane. I was really impressed. But there it was, the last one I checked on the aileron control rod on the outboard bellcrank. At first, I thought it was a setup to yank my chain as it was the only jam nut without any torque seal on it! Not a good month in the jam nut category. Let’s try to do better!
Vic Syracuse, EAA Lifetime 180848 and chair of EAA’s Homebuilt Aircraft Council, is a commercial pilot, A&P/IA, DAR, EAA flight advisor, and EAA technical counselor. He has built 11 aircraft and has logged more 9,500 hours in 72 different types. Vic also founded Base Leg Aviation and volunteers as a Young Eagles pilot and an Angel Flight pilot.